The art of contouring is possibly one of the most critical makeup procedures when it comes to enhancing your features. It’ll make your cheekbones your prominent and it can even help give your button-nose a narrow and slimmer look. Taking the contouring technique to the test, I’ve decided to make use of the best RM100 I ever spent on – The Naked Basics Palette (available at RM99 in Sephora Malaysia).
The Naked Palette didn’t excite me as much as the Naked Basics palette since I found nude matte shades to be extremely underrated. Matte shades are perfect if you want to create looks without looking too “made-up”, but there are eyeshadow brands that don’t offer you the coverage you need. Urban Decay always comes with superior quality eyeshadows and the nude shades appear really vibrant, even if it practically blends into your skin tone. The palette has been out for a while now, but to me it’s possibly every woman’s must-have palette of the season. Featuring five matte colours and one shimmering shade, you can go from a easy-breezy day look, to something smokey at night.
But before I go overboard with my praise for the Naked Basics palette, we’re going to show you how to contour your features using this tiny yet powerful makeup palette.
Contouring Your Nose
Using a flat brush, lightly run it through Naked 2, and then dust it off gently on your hand. Remember to use a clean brush or else you’ll have remnants of the old colors on your brush.
I chose Naked 2 because it appeared more natural. If you have darker skin, you can use Faint. Don’t forget to test it on your skin tone first.
Then carefully run it down your nose, starting from your brow bone right down to your nose. Follow the shape of your nose and don’t forget to follow the curves. It should resemble the silhouette of a pear.
Then use Walk of Shame (W.O.S.) at the outer sides of the Naked 2 contour lines, and follow the same instructions. Then, use a blending brush to blend Naked 2 and W.O.S. so that it blends evenly, while still highlight the lines Naked 2 creates.
Then, take Venus, the only shimmering shade, and dust it on the centre of your nose. The shimmer will give your nose a more slender appearance. It’ll take you a little while to get used to how prominent your nose will look like, so keep calm. But check out the results! See how a narrow nose can help your bring out the shape of your face and make it appear slimmer too?
Contouring Your Face
You can easily make mistakes when it comes to contouring your face, but with an angled blush brush, it’s really all the ammo you need! Contouring your face won’t necessarily make your face look slimmer, but implementing the right shades on the right places will enhance the structure of your facial features. A bronzer will come in handy for this technique, but avoid using a bronzer with shimmer in it because you want your look to appear natural. We’re saving the shimmer for later.
Instead of a bronzer, I’m using an orange-peach toned blush by Ronasutra Mineral Attraction Cheek Color in Apricot Orange. Ronasutra Mineral Makeup is a homegrown mineral makeup brand that offers great coverage and color and it’s formulated for Southeast Asian skin. And orange toned blush should be able to replace a bronzer.
The philosophy to contouring your face lies in the number “3”. Why? You want to create shaded lines on your face that looks like the number “3”.
Start by applying a little blush, just below your cheekbones using the angled brush. Run a line that gets gradually thicker as it gets closer to your hairline. Then move the brush down your jawline, and continue parallel to your cheekbones. Stop just before your chin. Move the brush upwards and continue the same steps up your forehead. Repeat steps on the opposite cheek.
Remember to start with very little color in the beginning. It’s better to do it in steps instead of using too much at once.
Lastly, use your powder brush and apply illuminating powder on the apples of your cheeks, the centre of your forehead and your chin. I’m using MAC Pearl Blend Face Powder in Veronica’s Blush. Blend it in so it appears softer. This will balance out the contouring and to help the lines appear smoother.
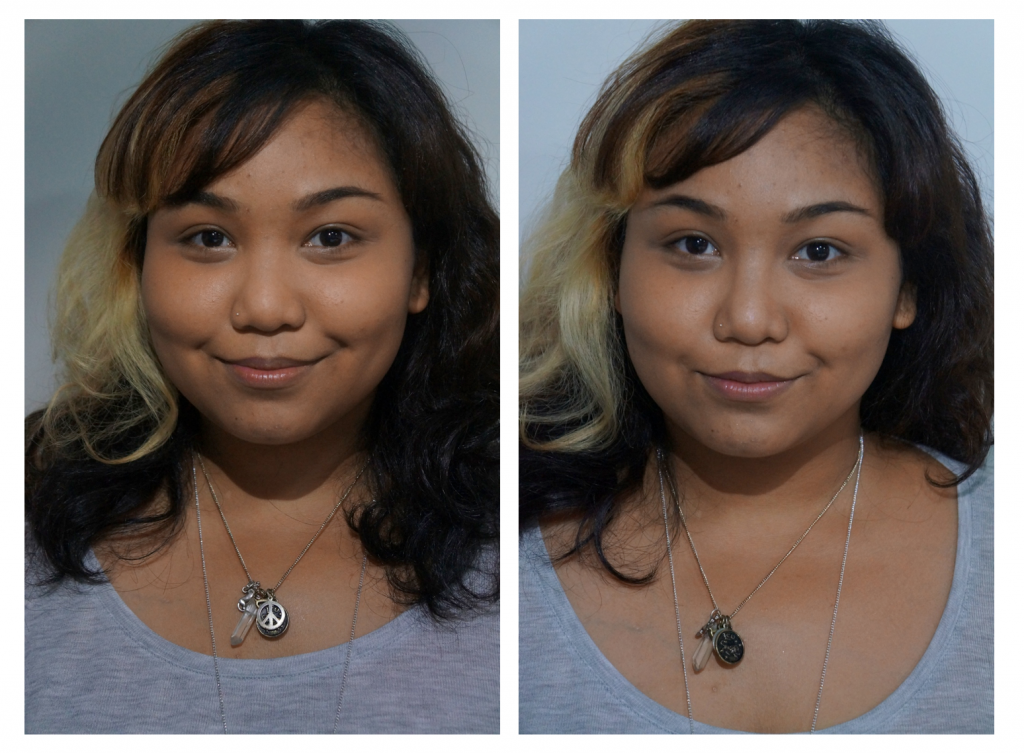
Here’s a before and after picture of myself, without any contouring, and with contouring, on top of a full face of makeup.
Now that you see just how contouring can make much a difference, it’ll be great to experiment with especially when you’re taking photos or during photo shoots. Just be cautious about the colors you choose to contour and remember the golden rule – little by little! See why every girl loves makeup?


